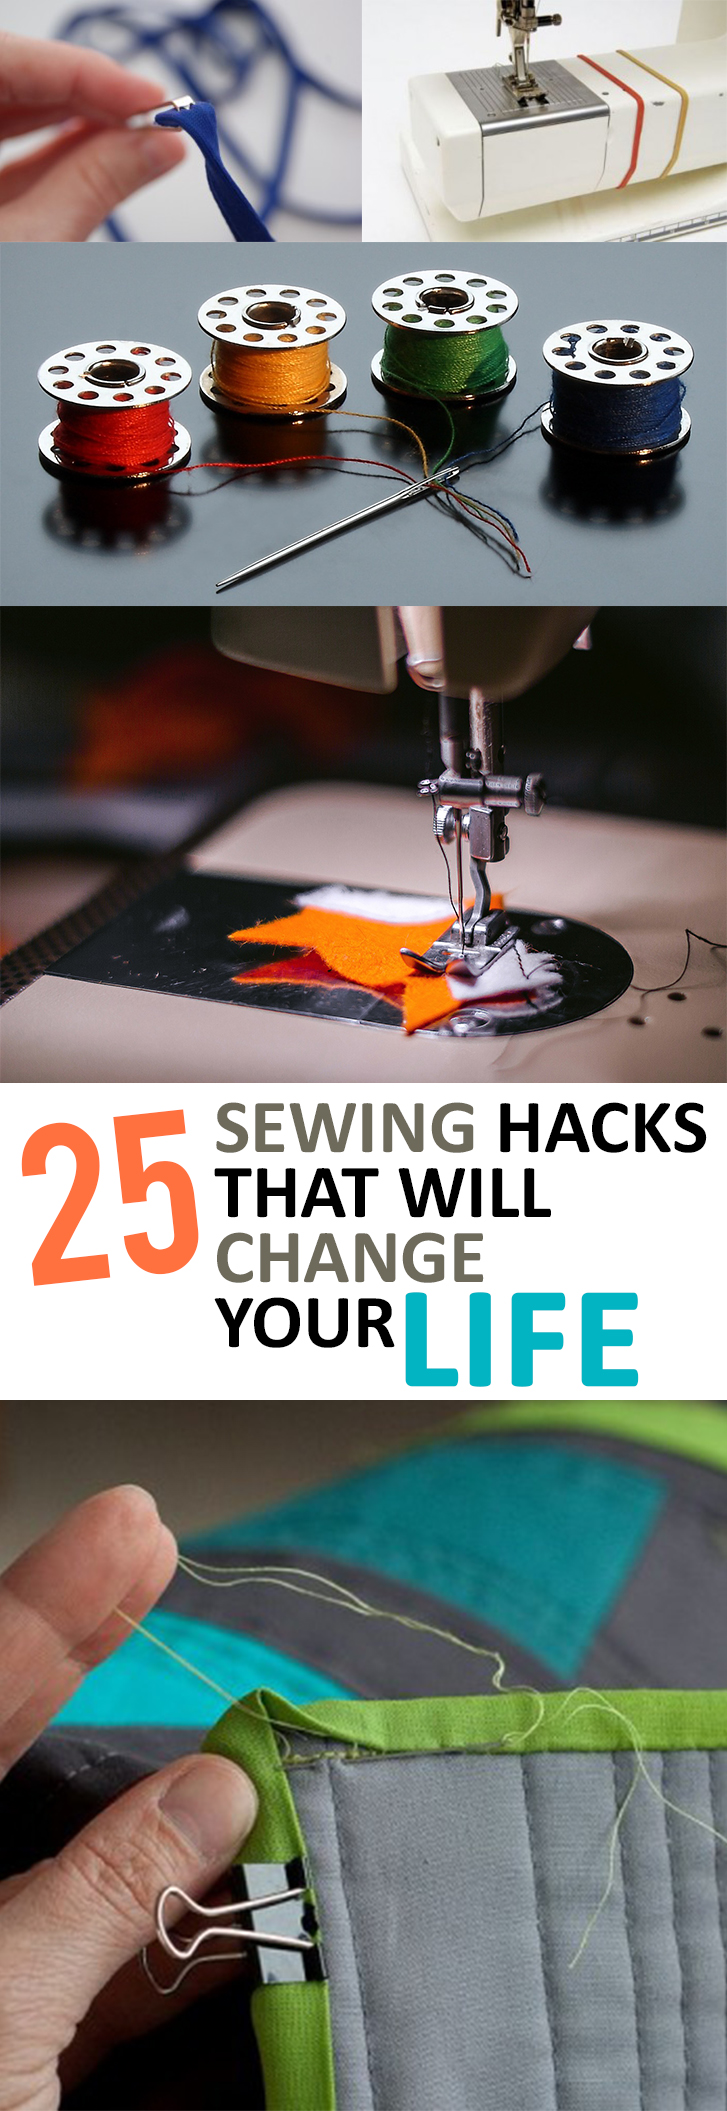
Do you love sewing as much as I do? Then you know that sewing hacks that work are a sewing lover’s dream! Check out the following 25 sewing hacks that promise to change your time spent sewing for the better.

- Use paperclips to hold peices of leather together. You cannot use pins because they damage the leather. Paperclips are the perfect solution.
2. Fill a pincushion with steel wool. When you put your needles in it, not only will they stay in place, the steel wool will also help sharpen your needles.
3. Use hairspray to get the tip of your thread to hold straight while you thread the needle.
4. To mark fabric use Washi tape! It’s ¼” wide so it’s great to help you measure seams.
5. To draw elastic out of the waistband on a clothing item, use a bodkin. It will also help you find missing cords in your drawstring pants and hoodies, which is so helpful! (Who likes digging around forever to find those strings?!)
6. When sewing on buttons or embellishments, make sure you have your hair straightener handy! You can use it to press the fabric in between each button.
7. Use metal washers as pattern weights.
8. When trying to create gathers in your fabric, use the cheating method {otherwise known as the corded zig zag method}. All you need to do is sew a large zig zag stitch over a piece of yarn. Then use the yard to create a gathered look in your fabric. It’s so easy to do! Just use a straight stitch to sew your gathers in place.
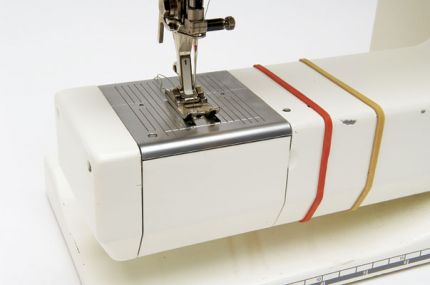
9. Use rubber bands around the base of your sewing machine to make a seam allowance guide.
10. When you are trying to sew over lumpy fabric that is difficult to work with, put a plastic bag over the top of your fabric. You should be able to glide right over it and it will be so much easier to sew.
11. This easy DIY project for fabric weights will make your life so much easier when you are trying to pin your fabrics. You can make it out of washers and a hot glue gun, and you will definitely be glad that you did!
12. Use cardstock to create your own hemline tool. It will help you iron straight hemlines and folds perfectly every time you use it! How genius is that?
13. Add magnets to the bottom of a bowl to keep your pins and needles in place.
14. Foam toe separators used for pedicures can actually come in handy when sewing! You can keep your filled bobbins stored in the slots where your toes go and they will be really easy to find (and all in one place) when you need them.
15. To create your own sew-on-the-go case, store some needles, pins and threads into a mini matchbox.
16. Don’t you hate when the threads unravel after you sew a button into place? Well, your problem can be solved with clear nail polish! Just cover the button with a coat of clear nail polish after you sew it and it will help to hold it in place longer.
17. Tie a long string (long enough to make a long necklace) through the handles of your scissors. Or run an old string of fake pearls through the handles. Wear your scissors around your neck so you always know where they are. This one is my favorite on this list of sewing hacks!

18. Put a rubber band around your sewing machine paddle so that your foot won’t slip when you are using it.
19. It’s important to keep your scissors sharp, and it can make a huge difference for your sewing projects. To easily sharpen your sewing scissors, use them to cut foil. This hack is quick, easy, and really helpful!
20. To make sure your measurements are always correct, attach a tape measure to the end of your table.
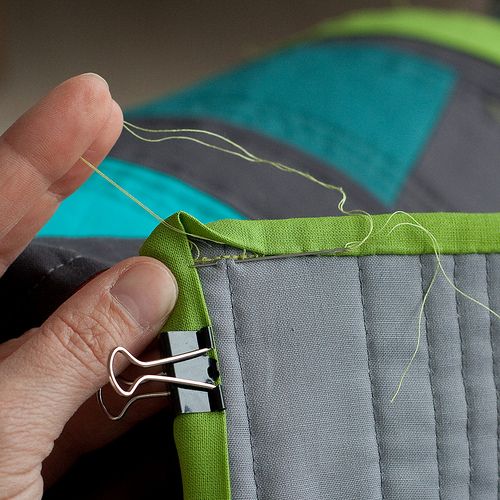
21. When quilting, it’s nice to have an extra set of hands but sometimes we don’t have that luxury. If no one is around to help you, you can use binder clips. They will hold your binding in place while you quilt and are also good for making a quilt sandwich.
22. To make sure you don’t go too far when you stitch buttonholes, slide a pin across the end of a buttonhole before you rip the stitches.
23. If you are making a quilt, find some old blankets you can use. They make fabulous batting inside your quilt.
24. When you have dull straight pins that are difficult to work with, try putting them in a piece of bar soap. The soap coats the pins and makes them slide through your fabric a lot easier.
25. When you need a quick seam allowance guide, use a rubber band to hold two pencils together. This gives you about an 8mm seam allowance.
Looking for more helpful sewing hacks? Don’t miss the 10 sewing tricks professionals refuse to share.
Thank you for those hints! I use the metal hair clips to hold the binding down while sewing it in place.
I wish there was more information for #8. I don’t know how the yarn is supposed to make gathers
Hi there! Here is a great tutorial that can give you some more information http://thedreamstress.com/2016/01/tutorial-how-to-sew-gathers-ruffles-with-cord-gathering-aka-the-easiest-way-to-gather-ever/
Mary,
After to sew across the yarn using the wide zigzag stitch you gather it by pulling one end of the yarn holding the other end still.
The yarn is your gathering tool.the zigzag zag is your yarn guide. Once zigzag Zayed on the yarn is ready to pull and adjust the the yarn and fabric. You can move the fabric to right area and how strong the garering. This is very similar to the way I gathered with a basting stich.good luck let us know how it went.
Is there a video for this. Sounds very cool, but I cannot seem to figure it out.
I am sure there probably is. Search on YouTube. They have everything there!
Anchor one end of the yarn by stitching back and forth over it. When you’re finished with the zig zag over the top of the yarn, hold the free end of the yarn that’s not anchored and push the fabric toward the anchored end. You will be gathering the fabric. The yarn is stronger than a long basting stitch and you are not as likely to break the yarn. Good luck!
Even better than yarn, which is easy to catch with the needle, is to use #20 fishing line. The needle glides over it and it is really easy to gather up the ruffle. Then once it has been stitched, it’s very easy to pull out, because sometimes the yarn or string will break on you. I’ve made several bedskirts recently using the fishing line, and it is so much easier.
You have to anchor the beginning end of the yarn with a couple of small stitches and then after you zig zag over the yarn ( or string) without stitching through the string you can pull the fabric up along the string and it will gather very easily.
I find this is the easiet. To gather. It works beautifully.
Sew a zig zag over the top, being careful not to sew down the yarn, then pull the yarn. The zig zag threads will slide over the yarn making it gather.
I have used string –Zig zag over the string and then pull to make the gathers… Use a narrow zig zag to keep control over the gathers.and then pull gently. Mark the fabric into sections before hand so that the gathers should be easier to even out. It is better than the ruffler foot for me. . Also on Sewing with Nancy(tv) she showed how to gather with basting stitch-and long thread tails—-Start stitching and the pull the bobbin thread forward directly under the foot to the front and sew over it- Then pull to make the gather… Have not tried it yet but it looks good. This was shown on the Doll clothes video.
I have done #8 and it is easy. On your gathering line lay yarn or heavy thread and zig zag over the yarn being careful not to catch the yarn in the stitch. when through simply pull the yarn and it will make your gathers.
Zig zag over the yarn, don’t catch the yarn though, hold one end of the yarn and slide the fabric down the yarn to form the gathers. Then sew a straight line through the gathers to hold them in place…. pull out the yarn. Done.
Use a large zig zag stich over the yarn….stich one end if yard in position..then pull other end of the yarn tight and move fabric into pucker
Sew 2 separate rows of your sewing machines longest straight stitches, then pull the 2 lines of stitches together to make the gathers, change your stitch length to “normal” stitch length,sew the gathered piece to whatever you’re attaching the gathered piece to, in between the gathering, then the “gathering lines” are easily pulled out after you’ve attached the pieces together.
Mary, in case you still haven’t figured out #8. Tye a knot at one end of the yarn, so it will not pull all the way through. While sewing the zigzag over the yarn, make sure it is wide enough to not catch the yarn in the stitches and do not backstitch. Once finished with the zigzag stitches, you will pull the yarn from the non-knotted end. This will gather your fabric. Once gathered, you can then sew them in.
To gather light fabrics, I just increase my stitch length and loosen tension temporarily, sew a straight line and then pull the bobbin side in to gather. Now sew a new line at proper stitch length and tension. Done. No need for yarn or string or zigzag.
You gently pull the yarn while securing the other end to make gathers a tight as you need.
Zig zag over the yarn. Make sure you don’t stitch over the yarn. Then all you do is pull on the yarn and it will automatically form your gathers! Good luck!
When you zig zag over the yarn do not catch the yarn. Then you hold the ends of yarn and gather your fabric. It’s like running a string inside a waistband. Hope this helps.
Sew a thread along the piece you want to gather about half an inch down from the edge. Then gently pull the thread from both ends to the required depth of the gather or ruffle and spread the fabric evenly as you would a curtain. Secure the ends and then machine to hold in place.
You can also use a large straight stitch (basting). Then grasp the two threads and pull Gently. One of them (I think the bobbin thread) will seem looser…hold that thread and gently start pulling the fabric away, the fabric will slide over the thread, gathering as you go. It is a slow process, but works.
It would only work if your machine sewed long enough zig zags and you were able to zig zag over the yarn without catching it in the thread. The best way to make gathers is to set your stitch length as long as you possibly can, then sew two lines one just above the seam line and one about 1/8 inch above that. Do not anchor your stitches when you start to sew and leave long enough threads to be able to pull on the end threads. When you come to the end of the section you wish to gather, leave long thread ends when you cut the thread. Pull gently on one of the ends. The material should gather along the loose thread. IF the section is too long to gather by pulling on just one end, you can work from the other end as well and if you need help with the middle sections, use a stitch ripper to pull up a stitch (without cutting it). Pull gently on it to gather in both directions from the stitch. Pin and sew the seam as you are asked to do in the pattern. Once done, it is easy to pull out the rest of the gathering thread and get rid of it. No messy threads left in the fabric.
I have used this method too & you can put a pin at one end perpendicular to the sewing line(s), then secure the thread by winding it to the pin, in the figure 8. That will keep the thread secured for you. When you’re done, just pull the pin out.
Zig zag over the yarn without letting the needle go into the yarn then pull the yarn and it’s father’s. Hop this helps.
It’s gathered
when sewing zig zag over the yarn, becareful not to let the yarn be caught in the needle, before you start secure the yarn on the fabric then begin your zig zag, the large stitching will also create a gather, when you get to the end you pull the yarn and it creates the gathers
Just lay yarn along the fabric where you want gathers.Then zig zag over the yarn being sure not to catch it in the stitch. Then just pull the yarn till the fabric has the desired gathers. I usually pin the ruffles in place at this point , then straight stitch.
the zig zag is sewn on top of the yard from point a to point b (where you need gathered)… then pull the yarn and it will gather the material to your desired length… continue with your sewing– waistband, the bodice, whatever… does that make sense?
Secure the yarn at one end & gently pull it through the zig zag stitch (like you would do when hanging a pair of curtains) the fabric will gather up.
You sew the widest zig-zag stitch you have over a string or piece of yarn, being careful to keep the yarn directly in the center…making sure not to accidently stitch on the yarn. Pull on both yarn ends to create and distribute the gathers evenly to the measurement you need. Then stitch the fabric gathers to secure.
Lay yarn where you need to gather, sew it down with large zig zag stitch. The yarn is encased but not needled through so it moves within the zig zag stitch to create gathers. You then sew with straight stitch to make the gathers stay.
Mary,I use yarn that is about 10 inches longer than I want the gathers to be and/or add another color tied in to extend it to fit fabric. Gather most to 1st yarn,etc & gradually pull 2nd yarn out. Then ease fabric to gather.
You zigzag over the yarn then pull on the yarn, gathering the fabric as you go. The stitching holds it in place.
You can also use elastic cord instead of yarn!
You stitch over the yarn, then pull it like a drawstring.
Dental Floss works much, much better
You see over the yarn using a wide zigzag stitch. Don’t sew on the yarn itself. Then, when you’re done, pull one end of the yarn while holding onto the fabric.
Don’t use yarn!! use dental floss, zig zag over the floss knot the end then pull to gather!
Hold you fabric after you sew
Zig zag stitch over the yarm and start pulling on the yarn and the fabric will gather up
Thanks, I love the V-neck directions, can’t wait to try it. The others are very useful and I plan on using several of them too! Thank You!
thank you for that idea
You can get a bag of binder clips for a dollar at the dollar store and use those.
I’m not saying this to be snippy but this piece would seem a lot sharper if someone would edit the typos, spelling (including foreign words), grammar and other basic issues of form. Please.
Yes, there’s a huge difference between a viola {a musical instrument}, and “Voila!” {the French expression}. But, I’m a professional writer and I see nothing wrong with a few typos in an otherwise well-written piece. When a creation like this gets lengthy, it can be easy to overlook a few mistakes, especially if you get wrapped up in making the entirety just right. Don’t worry about the naysayers. Overall, it’s articulate, well written, and very informative.
I know the criticism was intended to be constructive, but people who volunteer their time free-of-charge to share beneficial tips with others are a valuable commodity. They should be praised and appreciated. Thanks again!
Thank you, Becky. Well said. People need to lighten up.
I suite agree. If you want free tips, you’ve got them. That’s what most people are here for.
I agree. Thank you to all to are generous enough to “share” without a price tag.
Absolutely agree.
Becky….well said. I’m happy to be able to see something like this posting and get some much needed inspiration. Faye
Becky, what a lovely response. I too appreciate the great information and see no need to criticize the grammar.
Hear hear!
Could not agree more!!
Amen! Also, this being the Internet and not a professional sewing magazine, people need to remember that English may very well be the author’s second language. Considering that my sewing subscription costs me $36 every 6 months, I will take this, typos and all. I think I am intellectual enough to figure out what they meant.
So true Becky, God bless your kind heart. Kudos to the one who took the effort very informative.
Well said!!!!
From all the dyslexic readers in the room, thank you. 😀 Well said.
Thank you Katherine Gillard, I am 58 and have missed out on so much, because of fear of someone making fun of my spelling and grammar. 😉
Amen to that one Katherine! Lisa, I’m 60 and I know exactly, what you mean! I think I have just about wore out the Google microphone.
Well said, be grateful for the tips.
Well said!
Well, if you were able to understand the message then I think you need to get over it and try to enjoy the information rather than to edit it. That would be unless the writer asks you to do so.
My father always said you can spell “cat” CAT or KAT. The reader will know it is “cat”, but 2 plus 2 better always
equal 4.
I’m with you, Valerie. The printed word means something to me, so I appreciate proofreading and editing. Everyone makes mistakes, but proofreading and editing are what corrects those mistakes before they get published.
Yes I agree Valerie….spelling has always been important….One could aways do a spell check or double check before you post.
I agree with you completely, Valerie!
I totally agree …I am sorry to say … as it does become difficult to understand some of the instructions with the typos
English may not be her primary language. Also, it takes 1000 nice said things to heal 1 mean thing. So please stay positive. You never know how your words, although not meant “snippy”, can hurt someone who worked hard to make their video.
Get a life-it’s not an educational classroom publication for vulnerable students-this is Pinterest where friendly folks share their ideas thru multiple forms of communication. Go somewhere else to be judgemental.
Yes you are
Are asking for your money back!
You maybe being bit snippy as somebody has taken the time to write this to help others
I do agree with you completely. Gosh is there any harm in trying to do better with the next written piece? Sorry you got a lot of flack from people who I guess must just be too lazy to learn from their mistakes.
I want to say that most crafters are right brainers. I can look past the spelling errors and appreciate the tips I am reading for free.
Please be careful with scissors hanging around your neck. A local fabric salesgirl tripped and fell forward, and was stabbed in the stomach by her scissors.
Agree, NEVER hand scissors around your neck, or attach to body, pockets etc. VERY Dangerous idea.
Maybe you should take your own advice and proofread your comments before posting.
Sandra comment about the scissors was well put but having been a fabric saleslady I learned to use a pair of round nosed scissors and adjusted to not having sharp points as long as they cut. Never hurt myself.
I always have had my scissors hanging around my neck on a long lanyard and my frinds know me as the scissor necklace lady, I am also handicapped and sit in wheelchair so I dont run the risk of falling, but I also have to wear an ostomy bag and many years ago my scissors poked a small hole in my bag causing it to leak all over my clothes as I had bent over to pick something up that I had dropped…since then I still wear my sharp pointed stork scissors but use rubber safety tips that go up the whole shaft…problem solved…I dont know if a person were to fall down if a rubber tip would prevent an actual stabbing but I do think it would go a long way in helping to lesson the severity of it. I also had the impression the tip was to used when one was sitting down at the machine but anyway, that’s my input…
Also, as its been stated, this info was put out for all to enjoy and learn from at no charge. She took her personal time to provide us with some tried and true tips. The spelling should be a non issue…also perfection is not all its cracked up to be and does nothing more than cause anxiety in the perfectionist as nothing will ever be perfect. Come on, take time to smell the roses and appreciate it for the info and not what isn’t perfect…if you want perfect grammer and spelling, then buy a subscription to an actual magazine but free is free and it is very true that english may be her second language. Even if it’s not, this article wasnt about an english course on spelling and grammer, it was a very nice informative list of tips and tricks to help you with your sewing. Nothing she said was not easy to understand and with today’s riduculous texting shorthand, this was wonderful! Bravo to the author and keep right on doing what you’re doing as there are some of us that appreciate it and you, just for what it is and not what it isnt. If others arent happy than they can go write their own.
Incase many of you did not know “Only God has the right to judge”. My momma taught me that if I had nothing nice to say don’t say anything. I so appreciate any advice someone more knowledgeable than myself shares. I’ve also been a supporter of takingg what I can use from an article or conversation and leaving the rest.God Bless You sweet lady for sharing .
I’m finding a few rubber bands right now to hold down the sewing foot pedal! Thanks.
Never cut foil with your good sewing scissors, it actually is bad for them. Either use a sharpening stone or have a professional sewing scissors sharpener sharpen them. I would never use foil on my good Gingher scissors, I paid too much money for them. But if they are cheap scissors from the dollar store or retail chain store such as Target or Walmart, then go ahead. Check out the Gingher site for sharpening their scissors before ruining them. Also says how to care for them.
Thanks for referring me to the Gingher site for hints on sharpening my scissors. I’m going to check it out.
Genius! Especially the use of a rubberband as a seam guide. My new machine’s markings are impossible to see. Also, I tend to be a bit impatient with little problems when I’m working on a project. Nevermind the clutter, I’m far too frugal to buy a bunch of gadgets that have only one use.
I put a piece of silicone shelf liner under my foot pedal. it works great to prevent slipping, too. The rubberband will make it that much better. 🙂
Thanks so much for your help!
There are only seven
Hey Susan! I am sorry that you had issues viewing the rest of our ideas! If you use the arrows located above the articles, you’ll be able to scroll through the remaining ideas. I apologize for the confusion, and I hope you enjoy the article!
I have lace curtains that the hems have come undone. What is the best way to fix them without getting hung up with my presser foot?
Cut several pieces of tissue paper (or other lightweight paper) three times the width of your curtain’s hem. Fold them in half lengthwise and place over the hem with hem inside the fold, like a sandwich. Sew as you would normally, but with a slightly longer stitch length. Once you’ve finished sewing, very gently tear the paper away from the fabric and voila! You’re finished!
Thank you. Saves us novices many wasted hours and frustration. Appreciate you taking the time .
Becky …well said. I find typos in my writings after I have proof read but had already sent so who really cares. So nice to see these sewing hints and give me the inspiration I so neded! Whoops a Typo!
I use dental floss instead of yarn when I zigzag for gathers. It doesn’t stretch or break. Just an additional note – I also use dental floss to string beads.
Great Ideal Marylou. Thank you, I am going to use that!
I’m sorry but I’m not sure I understand the last tip. Is it in the measuring of a seam allowance that you use the two pencils as a guide? All these tips are great. I’ll be using several, especially the washi tape. We’ve come a long way since tracing paper and wheel!
The two pencils rubberbanded together to create a seam allowance tip is for when you are creating patterns or are making a pattern from an existing item without disassembling it. It is a big time saver to trace parallel lines (the sewing line and the cutting line) around your pattern piece with 2 pencils stuck together than to try and measure out your seam allowance distance with dots or dashes a certain distance from your sewing line and then go back and connect those to create your cutting line. By using rubber bands to hold the pencils together (instead of gluing them together) you can take the bands off the sharpen them. I personally have mechanical pencils that are glued to a spacer that I use for making my sewing and cutting lines. I love that I can change lead colors when I use them too! 😀
Great… new ideal always needed..
I have a singer xl 6000 does any one have this problem with it it will not transfer from the computer to the machine can anyone help singer is no help thank you
Try reinstalling the program on your computer.
Make sure what you are transferring is not too much for your machine to handle. I bought new card still had problem until a friend told me this.
The tissue paper works great when trying to sew silky material. I also use single ply paper towels.
You’re using “viola” ironically, right?
Great tips, especially for doing the quilt binding, I have been wrestling my corners into place so this will make for happy fingers
No matter how long I’ve been sewing (since I was 8), I’ve always found someone who has something clever to share with me.
Again, there are many new, great tips here from lots of creative and talented people who are willing to share generously with others. Thanks to all!
Where is the DIY pattern weights tip referred to in tip 11?
The link didn’t seem to be working, but I added it in when you click on the word “weights”. Hope this helps!
I didn’t find the link for the weights. What is it?
So sorry about this! I have no idea what happened to the link! Here’s the project link that I like to use: https://www.craftsy.com/blog/2015/04/diy-pattern-weights/
I don’t understand number 6.
You can use your hair straightener as a mini iron. Flatten the pieces in-between buttons to help them sew on better!
Thanks for sharing!
Sharing keeps this age old craft going. Many times I’ve found household items for a solution when the nearest fabric store is miles away or just plain too late at night.
Thank you for sharing .please don’t stop.
An alternative for tip #9 you can also use washi tape as seam guide.
another easy way to thread elastic through a casing is with a long zip tie the ones about 3 feet long that are meant to hold up crossover pipes under double wide homes works great. I keep one with my elastic supply and they are just stiff enough to push through the casing and the the locking end is big enough to fasten the elastic to easily and you can pull it through the casing in one motion.
I’m usually a bit of a nitpick when it comes to spelling and grammar and truthfully I didn’t even notice the errors. Were there errors? I guess I was more interested in the information you were kind enough to share.
Ann,
Thank you for your sweet reply! I truly appreciate it!
It appears that comment option has closed, hence using this luttle space. Ive just read through these helpful tips, and wish to add my tganks for them. I’m a veteran seamstress and always enjoy learning a new thing…now I discovered a whole bunch! Thank YOU, leaning us an ongoing process.
How do you do the gathering again?
I was so busy thinking how brilliant these ideas were, that I didn’t even notice the typos. All I could think was, why I didn’t think of that!
I am constantly amazed at how people criticize each other on the internet. As for me, I’m truly grateful that you took time out of your day to give these hints to us.
Growing up, I was taught, “If you can’t say anything nice, don’t say anything at all.” Obviously, not everyone was taught this.
It has come to my attention that when I read anything, the typos sort of leap out at me. I just go on reading and trying to soak up all the information people are kind enough and thoughtful enough to share. Thank you all so much. As for the people who are really bothered by typos, here’s hoping you never make any. Oh! I forgot! That’s different.
I have been sold on the “Wonder Clips” to hold binding and just about everything else together with my sewing and have in many ways almost replaced my pins (almost) but the binding clips I had never though of and they are so much cheaper! Those Wonder Clips can get quite expensive especially the bigger the size I get but these also come in big, little, small, and jumbo too for a fraction of the cost. Thank you so much for helping us novice and expert sewers out! I think of myself as beings somewhere in between those two terms. :0)
Kitti,
I am so glad that you found it helpful! Thank you for reading and taking the time to comment! 🙂
The picture with your article shows 4 bobbins threaded onto one needle, I don’t see anything related to that in the article. What’s that about?
We just wanted to add a picture that was related to sewing. Hope you have a great day!
Great tips, especially for someone like I am – I’ve been sewing for years, and have made many things, and still feel like a novice sometimes. Thank you!
Number 19, I have asked my Hubby to save his used sandpaper. And I use that to sharpen my scissors, I turn the sandpaper over and cut that waay too so I get both blades. But you should have seen the look in his face then I asked him to save it for me. I took my scissors out to his workshop with me so I could show him. So he saves me his 60 grit. He said that one was the best grit. Thank You So Much Kate, for sharing all your tips and so much more.
I’m just wondering, is this article about sewing or was it an English class? I took it to be about sewing and not the proper way to spell. We all make mistakes and auto correct doesn’t always work. Sometimes it has a mind of its own! By the way, did I spell everything correct here people?
Thank you very much to sharing this tips
If I may make a suggestion? My southern granny always used butter knives (regular table knives) as pattern weights. I’ve been using them the 40+ years I’ve been sewing. They are smooth, they easily fit on sharp corners and they’re always in your kitchen.
Paula,
I had never considered this! What a great idea! Thank you!
When sewing buttons on, thread the ends between the button and fabric….tie knots. They are hidden and subjected to less outside forces.
Not all washi tape is 1/4 in. wide. It comes in lots of different widths.
I’d be great if someone could produce a SINGLE YouTube video showing all of these techniques being demonstrated.
OMG! My life changed so drastically I’m shocked!
Ohmygosh I had a good laugh at the hairspray one. Talk about a sticky mess. Keep a block of beeswax to use on thread and save yourself the mess. And this article seems to be fairly recent so I guess they are stretching for “new” ideas but they have binding clips nowadays that do the work of paper clips and other office supplies. They are wonderful for bulky items like polar fleece and for quilt binding. And pretty pretty please do not ruin a nice quilt by using an old blanket as batting. Give the old blanket to the dog and go get some warm and natural.
These are really great sewing hacks. Do you mind if I share these with my readers?
Please do! Just link back to me please 🙂
Don’t like the string to keep your scissors close – strangulation risk as even sensible people can have their moments!. An alternative idea along the same lines is to use an old lanyard with a quick release fastening and save your string
Great tips, especially for someone like I am – I’ve been sewing for years, and have made many things, and still feel like a novice sometimes. Thank you!