 Confession. I have a woodworker in my home, and I am not afraid to use him. I know there are some crazy crafty talented women out there, that would rock the board and batten themselves, but when I have a perfectly good husband standing right there, why would I? So, my part in this project was in the area of design, advice, gofer-ing, supply gathering and clean up. Fine. He cleaned up, too. But I was an excellent support system as he worked this project.
I had him write his tutorial on the board and batten project, so here is his take on it:
Steps to Install Board and Batten
1. Remove all the existing baseboard and trim that will interfere. I know a lot of people just put the board and batten above existing baseboard, but I really prefer the finished look of putting up new thick tall baseboard that is fluent with the new board and batten walls.
2. Smooth out any texture or flaws you may have on your existing walls. We hired our favorite sheet rock guy to come in and smooth out the wall beneath where the board and batten would be. This gives it the look of having a flat back board but with much less hassle.
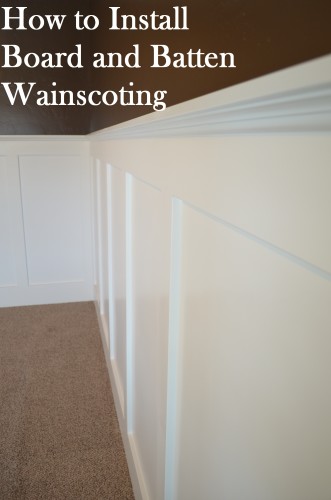
3. Install baseboards, I probably did this the hard way. I went to home depot and had them rip all of my materials from a sheet of mdf. This was less expensive than the pre-finished and allowed me to have nice clean joints. I would definitely recommend at least priming the edges of the boards where they will be exposed. I didn’t do this and it proved to be VERY difficult to spray once it was up. I used 8” tall pieces for the baseboard.
4. Next, I cut all of my 4” vertical pieces and nailed those up. I did not use liquid nails but in hindsight I wish I had. I will be using it on my next board and batten project, so I will give you the update. I spaced them about 20” apart, adjusting slightly where necessary to avoid awkward situations with the window sills and outlets.
5. Then I put the top piece on which was 6” tall. On all of my joints where I had to connect lengths to span a single wall I cut each end at a 45 degree and nailed through them both, this helps hide the joint when it is all finished.
6. I put on a 2 1/2” cap with a piece of home depot trim underneath for the top of the board and batten.
7. Next I covered all of my nail holes with sheet rock mud and covered all joints and edges with caulk. Then I used an 1/8” round over router bit to round off all of the edges of the board and batten. If you bought the pre-primed MDF from Home Fepot it already has this done.
8. Once that was all finished I primed and painted the board and batten. Now we were ready to paint above the wall so I finished that as well after the board and batten to get a nice crisp line between the board and batten and the newly painted wall above.
We really love how it turned out. I am doing the dining room next, and I think this will be a much easier and faster go, since I already know the shortcuts.
Spot on with this write-up, I really feel this site needs a great
deal more attention. I’ll probably be back again to read more,
thanks for the advice! Casket
Very good facts. Cheers!.
Worthwhile details, Thank you.